NestJS 基础知识
NestJS Lifecycle
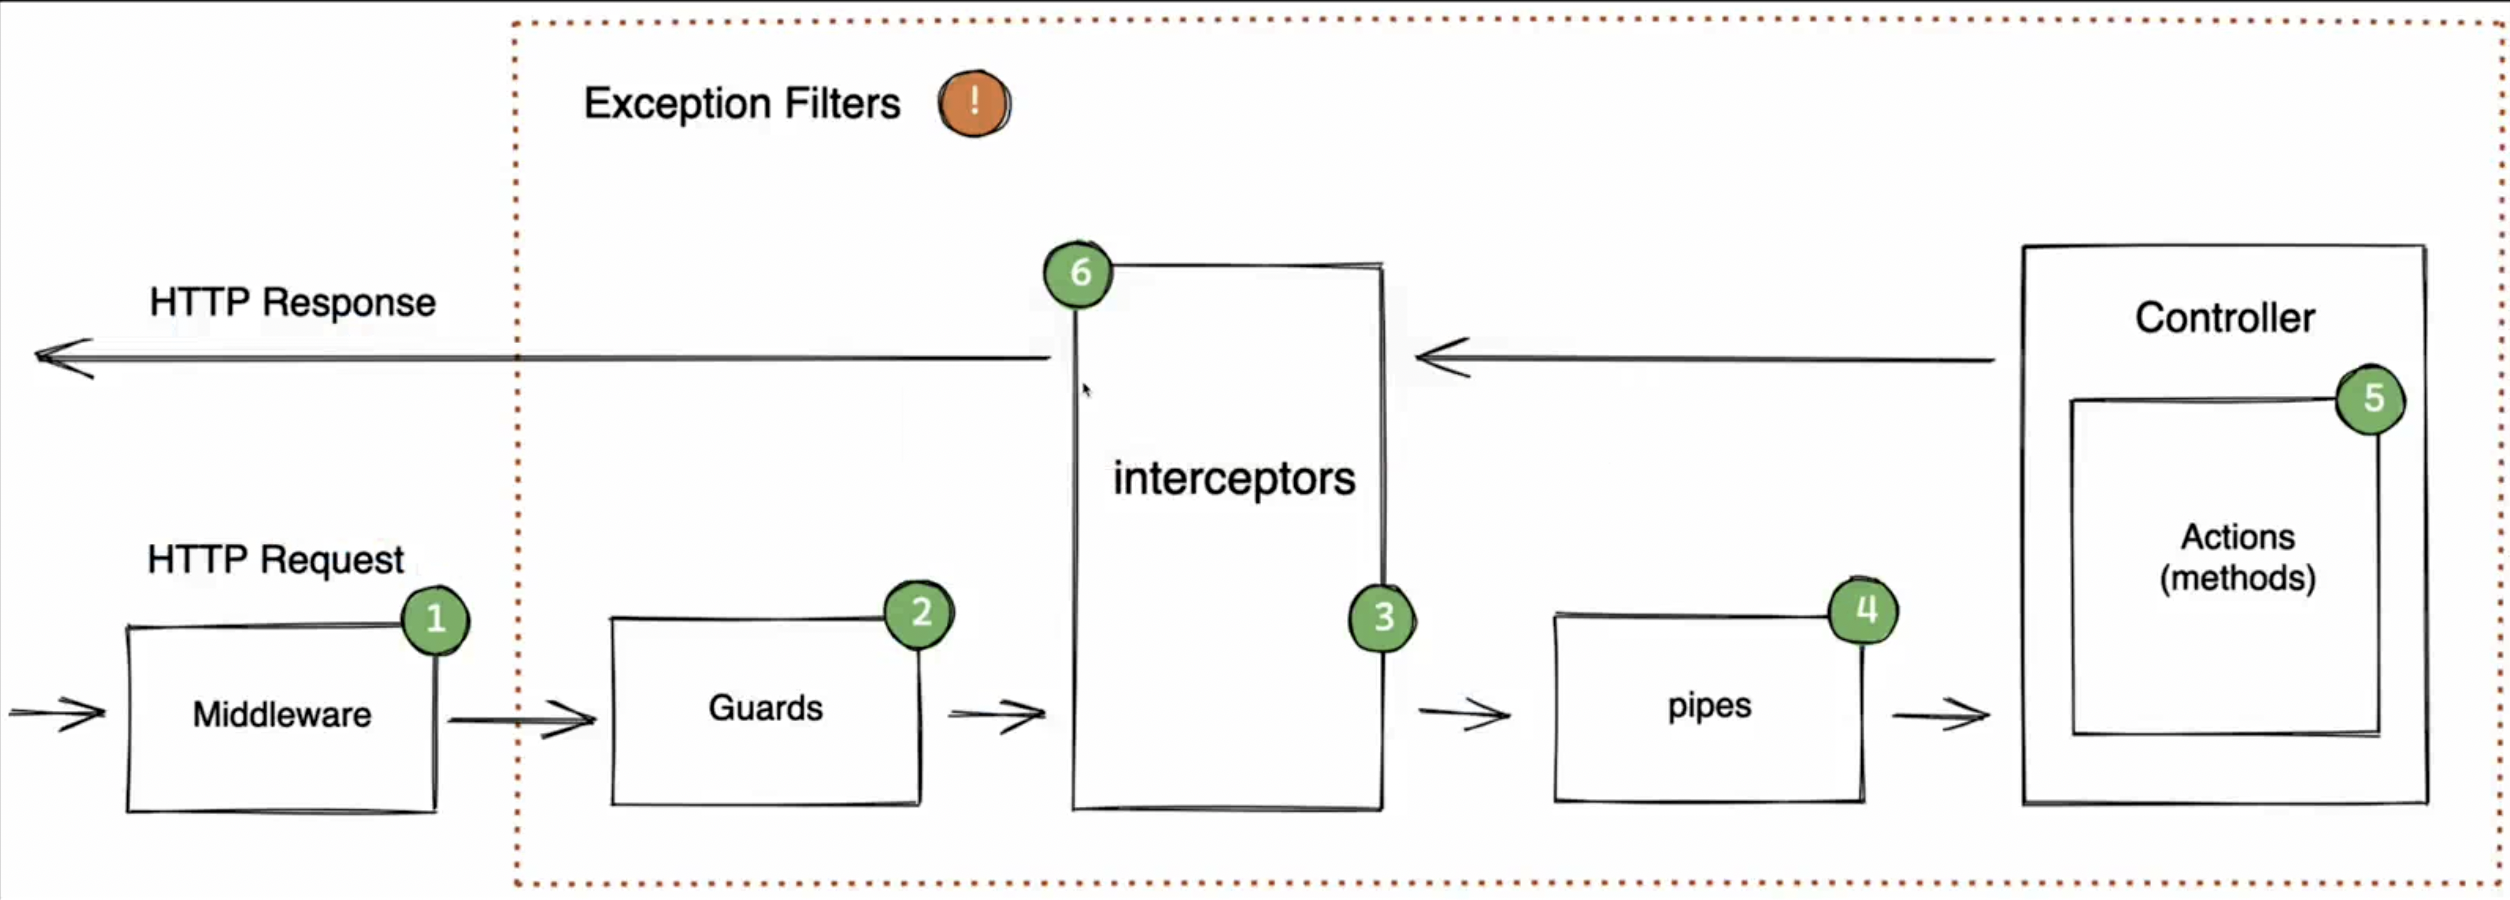
Guards:保护路由的组件,用于权限验证和访问控制,在请求到达控制器之前进行身份验证和授权检查
ts@Injectable() export class AuthGuard implements CanActivate { canActivate(context: ExecutionContext): boolean { const request = context.switchToHttp().getRequest() return this.validateRequest(request) } }Interceptors: 用于拦截请求和响应的组件,可以在请求处理前后添加额外的逻辑,如日志记录、数据转换等
ts@Injectable() export class LoggingInterceptor implements NestInterceptor { intercept(context: ExecutionContext, next: CallHandler): Observable<any> { console.log('Before...') return next.handle().pipe(tap(() => console.log('After...'))) } }Pipes: 用于数据转换和验证的组件,对输入数据进行验证、转换和清理
ts@Injectable() export class ValidationPipe implements PipeTransform { transform(value: any, metadata: ArgumentMetadata) { if (!value) { throw new BadRequestException('Value is required') } return value } }Controllers: 处理 HTTP 请求的组件,接收请求、调用服务层处理业务逻辑、返回响应
ts@Controller('users') export class UsersController { @Get() findAll() { return [] } }Exception Filters: 用于处理异常的组件,捕获和处理应用程序中抛出的异常
ts@Catch(HttpException) export class HttpExceptionFilter implements ExceptionFilter { catch(exception: HttpException, host: ArgumentsHost) { const ctx = host.switchToHttp() const response = ctx.getResponse() const status = exception.getStatus() response.status(status).json({ statusCode: status, message: exception.message, }) } }Middleware: 不常用,用于处理请求和响应的中间件,可以在请求处理前后添加额外的逻辑,如日志记录、数据转换等 创建中间件的命令:
nest g middleware common/logger
Dependency Injection
概念:依赖注入是一种通过外部提供依赖对象来实现组件解耦的设计模式。
假设我们有一个餐厅系统,其中包含以下组件:
- 服务员(Controller)- 负责接收顾客的点餐请求
- 厨师(Service)- 负责制作食物
- 厨房设备(Logger)- 用于记录烹饪过程
在 NestJS 中,这可以表示为:
typescript
// 厨房设备(Logger)
@Injectable()
export class KitchenLogger {
  log(message: string) {
    console.log(`[厨房日志] ${message}`)
  }
}

// 厨师(Service)
@Injectable()
export class ChefService {
  constructor(private readonly logger: KitchenLogger) {}

  cook(food: string) {
    this.logger.log(`正在烹饪: ${food}`)
    return `美味的${food}`
  }
}

// 服务员(Controller)
@Controller('restaurant')
export class WaiterController {
  constructor(private readonly chef: ChefService) {}

  @Post('order')
  takeOrder(@Body('food') food: string) {
    return this.chef.cook(food)
  }
}
在这个例子中:
- 服务员(Controller)不需要知道如何制作食物,只需要把订单交给厨师(Service)
- 厨师(Service)不需要自己创建日志记录器,NestJS 会自动注入
- 所有组件都通过
@Injectable()装饰器标记为可注入的 - 依赖关系在构造函数中声明,NestJS 会自动处理实例化和注入
这就像在餐厅中:
- 服务员不需要知道如何烹饪,只需要把订单交给厨师
- 厨师不需要自己准备厨房设备,餐厅会自动提供
- 每个角色都专注于自己的职责,通过依赖注入实现了解耦
nestjs 主要使用依赖注入来保证组件之间的解耦,通过 @Injectable 装饰器来定义一个可注入的类,再通过 @Module 装饰器来定义一个模块,在模块中通过 providers 属性来注入依赖。
e2e test
区别于单元测试,e2e 测试是测试整个应用程序的流程,包括数据库、外部服务等。 可以通过下面的方法拿到测试时的一些信息:
ts
import { INestApplication } from '@nestjs/common'
import { Test, TestingModule } from '@nestjs/testing'
import * as request from 'supertest'
import { App } from 'supertest/types'
import { AppModule } from './../src/app.module'
import { AppService } from './../src/app.service'

describe('AppController (e2e)', () => {
  let app: INestApplication<App>
  let server: App
  let appService: AppService

  beforeEach(async () => {
    const moduleFixture: TestingModule = await Test.createTestingModule({
      imports: [AppModule],
    }).compile()

    // 创建 NestJS 应用实例
    app = moduleFixture.createNestApplication()
    // 获取 http server
    server = app.getHttpServer()
    // 获取服务实例
    appService = app.get(AppService)
    // 初始化应用
    await app.init()
  })

  describe('GET /', () => {
    // ......

    it('should return random emoji and browser when index and user-agent are provided', () => {
      // 调用服务实例
      const emojis = appService.getEmojis()
      // 调用 http server 验证响应结果
      return request(server)
        .get('/')
        .set('x-api-key', 'SECRET')
        .set('user-agent', 'Chrome')
        .expect(({ body }) => {
          expect(emojis).toContain(body.data.emoji)
          expect(body.data.browser).toBe('Chrome')
        })
    })
  })
})
使用 github action 和 railway 部署项目
github action 基础概念
可以通过 github 自定义 action 和 workflow 来自动部署项目,这个过程也称为 CI/CD。 首先创建以下的目录结构:
bash
├── .github
│   ├── actions
│   │   └── build
│   │       └── action.yaml
│   └── workflows
│       ├── deploy.yaml
│ └── test.yamlactions:定义可重用的自动化任务。特点:类似于函数,可以被多次调用;封装了具体的执行步骤;可以在多个 workflow 中使用。workflows:定义完整的 CI/CD 流程。特点:类似于主程序,包含完整的执行流程;可以调用多个 action;定义触发条件和执行顺序。- 两者关系:Actions 是"工具"(如锤子、螺丝刀);Workflows 是"使用这些工具完成的工作"(如组装家具)
actions/build/action.yaml:
yaml
# action 的名称,用于在工作流中引用
name: Build

# action 的描述,说明这个 action 的功能
description: Sets up repository

# 定义 action 的运行方式
runs:
  # 声明这是一个组合动作,必填字段
  # 可选值为 'composite'|'docker'|'javascript'
  using: composite

  # 定义要执行的步骤序列
  steps:
    # 步骤1:检出代码到工作目录
    - name: Checkout
      # 使用官方的检出代码 action
      uses: actions/checkout@v4

    # 步骤2:设置 Node.js 环境
    - name: Install NodeJS
      # 使用官方的 Node.js 设置 action
      uses: actions/setup-node@v4

    # 步骤3:设置 pnpm 包管理器
    - name: Set up pnpm
      # 使用 pnpm 官方的设置 action
      uses: pnpm/action-setup@v4
      # 传递给 action 的参数
      with:
        # 指定 pnpm 版本为最新版
        version: latest

    # 步骤4:安装项目依赖
    - name: Install dependencies
      # 指定使用 bash shell 执行命令
      shell: bash
      # 要执行的命令
run: pnpm installworkflows/test.yaml:
yaml
# 工作流的名称
name: Test

# 定义触发条件:什么时候运行这个工作流
on:
  # 当代码推送到 main 分支时触发
  push:
    branches:
      - main
  # 当创建或更新 pull request 时触发
  pull_request:
    branches: ['*'] # 对所有分支的 PR 都触发

# 定义要执行的任务
jobs:
  # 第一个任务:运行单元测试
  unit-tests:
    # 指定运行环境
    runs-on: ubuntu-latest
    # 定义任务步骤
    steps:
      # 检出代码到工作目录
      - uses: actions/checkout@v4
      # 使用自定义的构建 action
      - uses: ./.github/actions/build
      # 运行单元测试
      - name: Run unit tests
        run: pnpm test

  # 第二个任务:运行端到端测试
  e2e-tests:
    # 指定运行环境
    runs-on: ubuntu-latest
    # 定义任务步骤
    steps:
      # 检出代码到工作目录
      - uses: actions/checkout@v4
      # 使用自定义的构建 action
      - uses: ./.github/actions/build
      # 运行端到端测试
      - name: Run e2e tests
        run: pnpm test:e2e
使用 github action 和 railway 部署项目
添加部署的 workflow 文件
yamlname: Deploy on: workflow_run: workflows: [Test] types: - completed jobs: deploy: if: ${{ github.event.workflow_run.conclusion == 'success' && github.ref == 'refs/heads/main' }} runs-on: ubuntu-latest steps: - uses: actions/checkout@v4 - uses: ./.github/actions/build - name: Install Railway CLI run: | npm install -g @railway/cli echo "PATH=$(npm config get prefix)/bin:$PATH" >> $GITHUB_ENV - name: Check Railway CLI version run: railway --version - name: Deploy to Railway run: railway up -d -s random-emoji env: RAILWAY_TOKEN: ${{ secrets.RAILWAY_TOKEN }}添加 Railway 的 token。
- 生成 token 在这个页面
- 添加 token 到 github 项目下的 Settings/Secrets and variables/Actions 中,名称为
RAILWAY_TOKEN。